|
|
|

|
|
||||
|
|
||||||
|
|
|
|
Modelers Scaling Tool
|
|
Updates 2013 June 24, added instructions for scaling images, see bottom of page. 2009 August 13, added page. AboutConverts and scales between foot / inch, and meter / centimeter / millimeter type lengths. Also helps with getting scale lengths from images. UsageYou may need to click twice at first, or if you moved your mouse pointer off of the tool. Once to set focus on the tool and the next to select a choice. Select scale and input / output types. You may enter both a large and small dimension (ex: feet and inches) or just one. Changing the input type will clear the input boxes so select the type before adding dimensions. "Add Label To Result" is optional and will prefix the result with whatever you enter. Use labels to keep track of multiple scaled dimensions. Use the 1/1 scale for straight standard / metric conversions. Results are limited to 100, after which the "CLEAR ALL" button must be pushed. To copy results, click on results box, right-click and choose "select all", then right-click and choose "copy". Or click on results box then use keyboard shortcuts (usually ctrl/a - ctrl/c) to select all then copy. Options
Option "Clear On Click" will clear the dimension or pixels, and label boxes when clicked on again, as long as they are not still active.
Option "Clear On Result" will clear the dimension or pixels, and label boxes when a result is added. Option "Plain Output" will give a short result of the label (if entered) and the scaled length. Option "Reverse Scale" will scale the results up by the selected scale. Buttons
Button "Add Result" will add the conversion results to the results panel.
Button "Clear Inputs" clears the dimension(s) and label boxes. Scale will be kept. Button "CLEAR ALL" will also clear the results box. Scale will be kept. Button "Help" shows this text. Image Scaler
The "Pixels" input option is used on the orthographic type drawings (no perspective warp) found on this website, and when the only dimensional reference available is a photograph. You must know the dimension of at least part of the image to use this method. Accuracy when used on orthographic drawings is good.
Accuracy when getting dimensions from camera images is not the best and varies with the distance to the subject, and the field of view (fov). For example, a wide angle image of the side of a ship taken relatively close to the ship will appear to bulge in the center. This is because the camera is closer to the center of the ship than it is to the ends. An image of the same ship farther away and zoomed in will appear more normal. The distance difference between the center and ends to the camera is less. Think of triangles drawn from the camera, to the center, to the end, and back to the camera for the two images. The difference in the length of the legs is less with the zoom shot. This goes for height as well as width. High resolution zoomed images are best, they have a smaller fov. Using just a section of an image also lessens the fov and minimizes distortion. Any parts closer to or farther from the camera than the reference part with the known dimension will be either smaller or larger than the results show. The same goes for the center and edges of the photo. If your reference part is in the center, results for parts near the edges will be smaller than actual scale. You will need a graphics program that allows you to draw a selection on the image and show the pixel width and height of the selection. I use Irfanview for this, a free program with basic graphic editing functions. The selection size will be shown in the caption bar at the top. During installation it may ask if you also want to install Yahoo toolbar so pay attention. Draw a selection around the reference part you know the dimension of to get the pixel width or height. Enter this in the "Known Pixels" box and the dimension of the part in the "Known Dimension" box. Draw a selection around the part you want to get the dimension of and enter this in the "Enter Pixels" box. The result will be in the same unit of measure (uom) you entered in the known dimension box. Error Messages
"Error Messages" will show input errors like a letter in a number box, if dimension or scale is missing, or if more than one decimal place is entered. Too small, too large, or too long of inputs will show an error. Too small or too large a result will show an error.
Pay attention when entering a dimension. If you enter a letter for a number, then another number, the error box will clear without your knowing a number is missing. For example if you accidentally enter an "e" for a "4" like this: "275e8", the input box will only show "2758" if you didn't catch the error message. If results round to zero you will get an error. Try raising the decimal places. Limits
Scale: min 1, max 999,999 or 12 characters including decimal point
Known Pixels: min 1, max 99,999 or 7 characters Known Dimension: min .0001, max 99,999 or 12 characters Foot / Meter input: min .0001, max 999,999 or 12 characters Inch / Centimeter / Millimeter input: min .0001, max 999,999,999 or 12 characters Pixel input: min 1, max 99,999 or 7 characters Label: 100 characters Output: min .00001, max 14 characters Results: max 100 results Scaling ImagesSometimes I find it handy to scale a scanned drawing so I can measure directly from it by using the mouse to draw a selection box that you can see the size of in pixels. For example, if I use the mouse to draw a selection at the outer edges of a part and it is 400 x 325, if I've scaled the image to 10 pixels per inch I know the part is 40" x 32.5". This only works well if the drawing is accurate and of a decent size. And you'll need to know the width or height of at least 1 object on the drawing like the length of the ship. It's not hard. Basically, you need a number to multiply the width or height of the image by, so you can resize it to scale. The steps are:
-Find the size in pixels of a part with a known dimension.
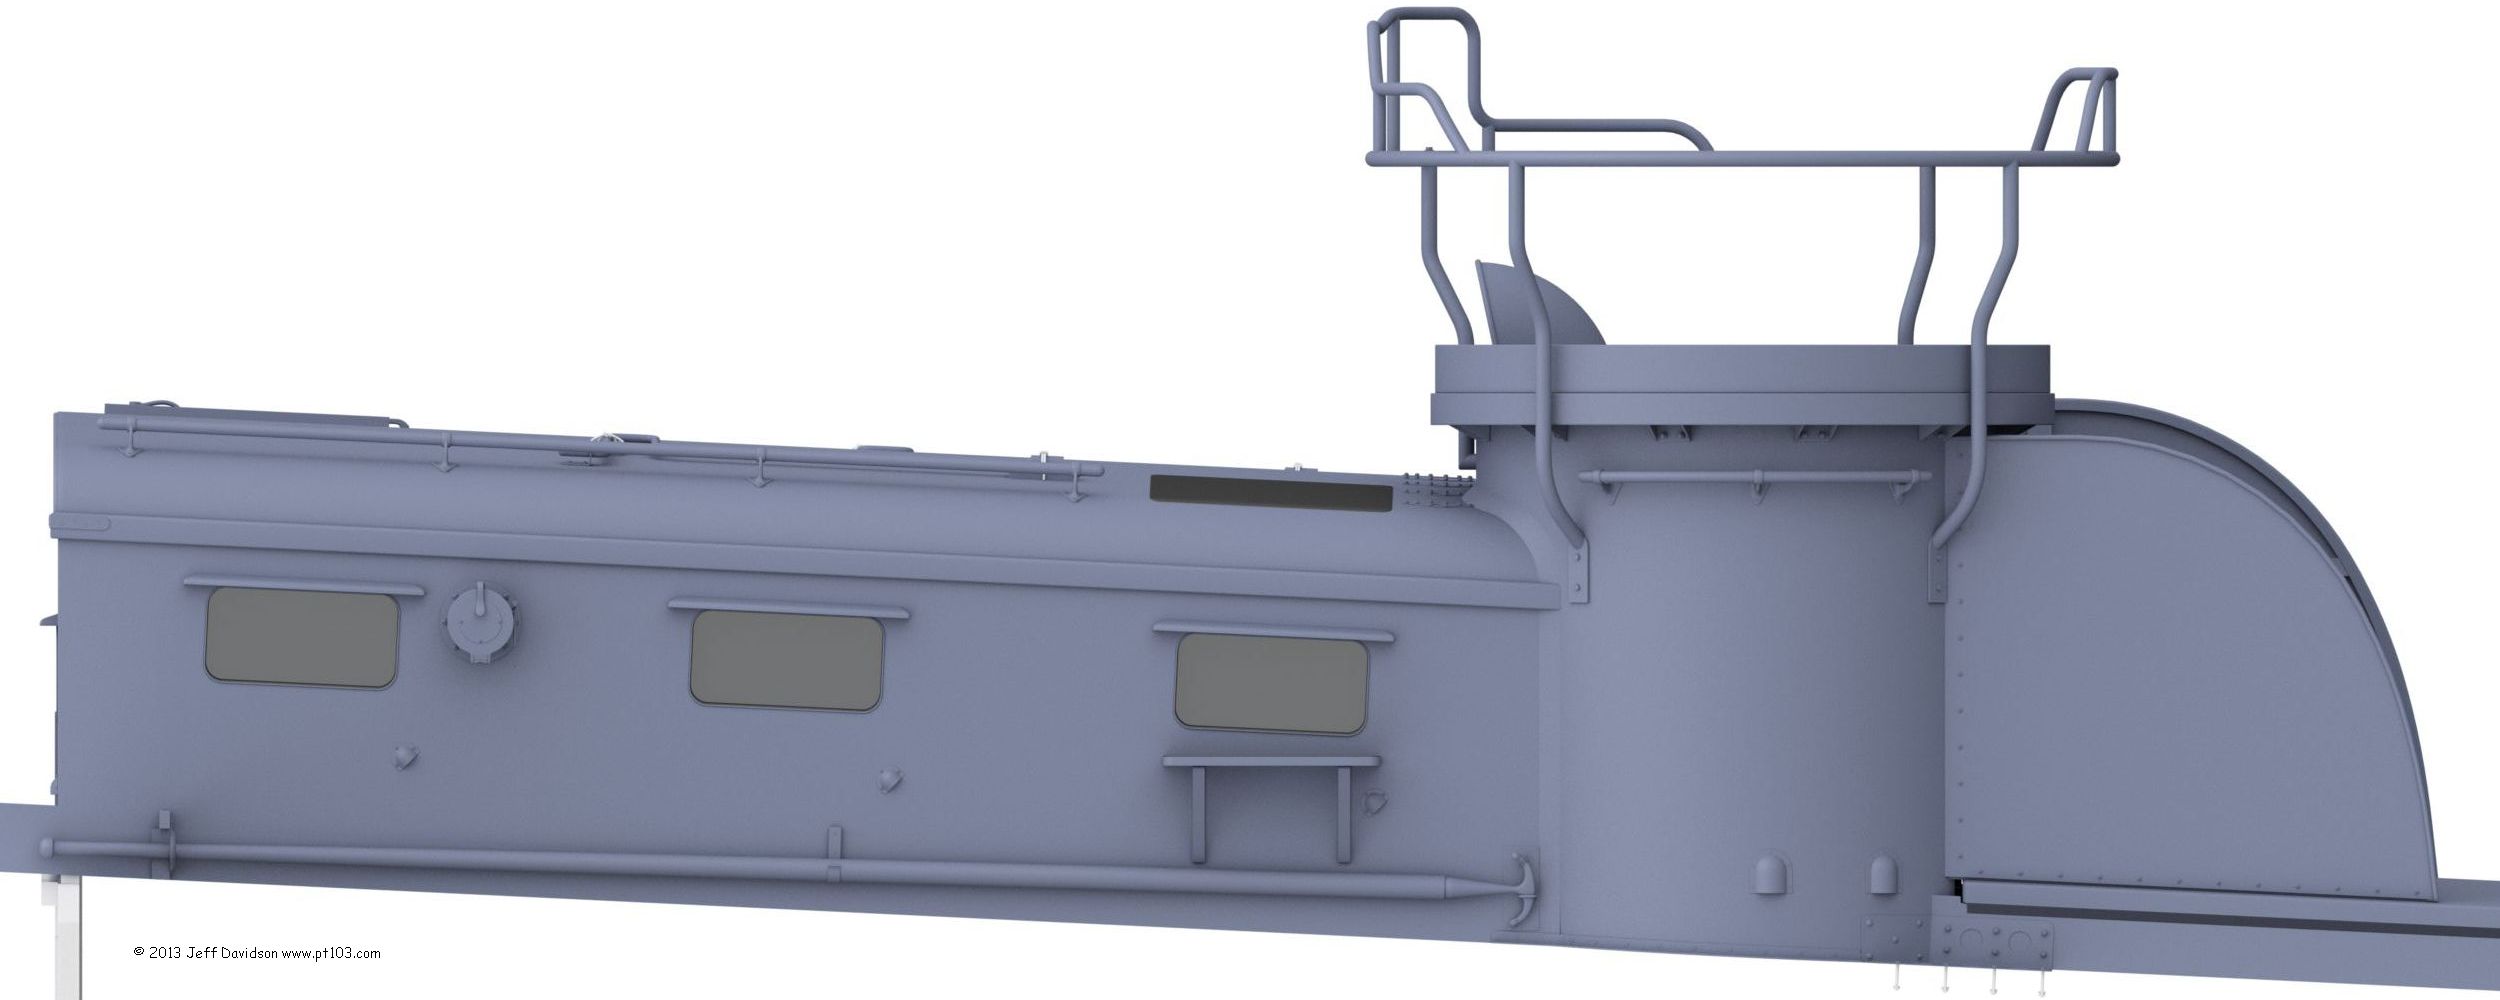
Details: The following uses a well known free image viewing tool, Irfanview. I've used it since 2000 as my default image viewer. If you decide to try it, pay attention to the install dialog. Nowadays I think it asks if you want to install something like Yahoo toolbar. You'll probably want to uncheck the box. I also install the separate plugin pack. If you can't see what I describe below such as image size, check menu / View (show status bar and caption). Irfanview is available here: http://www.irfanview.com What ever you use, it needs to be able to draw a selection box that you can see the size of in pixels. You also need to know the image size in pixels. In Irfanview, image size is shown in the bottom toolbar on the left. The usual way to draw a selection box is to position the cursor to the upper left of where you want the box to be, left click and hold, then drag to the lower right until the box is drawn. In Irfanview, the size in pixels is displayed in the caption (upper) bar. You can left click the selection box to zoom to its size before beginning, to be able to adjust the box edges accurately. To adjust the box borders, hover over over an edge, left click and hold, and drag to size. You can also crop to the selection. The image I'll use as an example is of a PT boat day room cabin 2500 x 1000 pixels in size. If you want to try the example it is here: dayRoomCabinScaleTest.jpg I need to know 2 dimensions, of 1 item in the image. The larger the item in the image the more accurate the results will be. In this case, the item is the 2nd turret ring from the top which I know is 51.5" diameter. I'd rather use the larger day room cabin, which I know is 143" from outside of the fwd and aft bulkheads, but the aft end is not visible in this view. I also need to know the item's width in pixels in the image. Zoom into the turret top and draw a selection box that is the width of the item. I came up with 624 pixels. I now know that 51.5" = 624 pixels in the image. Convert to scale if desired. For 1/35 scale, 51.5" divided by 35 = 1.4714285714285714285714285714286". Keep all the decimals you can for now. Convert to metric if desired, 37.374271mm in this case. So now we have:
Full Scale:
1/35th Scale:
Now I need to decide whether to scale up (preferred) or down. Sometimes this is a hard choice. The image is already large so I don't want to enlarge it too much. I can also crop out just the area I want to get measurements from which will make the end result smaller. I'll use the full scale dimension above. Looking at "51.5" = 624 pixels", I see that the smaller of the 2 numbers is 51.5. Move the decimal and / or add zeroes to the smaller number until the numbers are as close as possible. In this case, 515. Moving the decimal or adding zeroes only affects the final scale, for example whether 1" = 10 pixels or 100. Divide this number by the 624 pixels, I can see I'll be scaling the image down a bit because the result is less than 1, 0.82532051282051282051282051282051. I'll call this the scaling factor. It is actually a percentage, in this case I want the image about 82.5 percent of the original. The scaling factor should be between 0 and 10. If I didn't want to scale down at all, I'd have to enlarge the image by about 825 percent using a scale factor of 8.2532051282051282051282051282051. Note that you can move the decimal here also. In Irfanview, look in the lower left for the image size given in width x height. Use whichever is larger, the 2500 width in this example. Multiply 2500 x the scaling factor which results in 2063.30128205128205128205128205. Get rid of the decimals by rounding up or down, 2063 in this case. This is the width I want to resize the image to. In Irfanview, on the menu click Image, then Resize/Resample. Make sure "Preserve aspect ratio" is checked. Enter 2063 under "Set new size / Width". The image is now scaled. Checking the results, drawing a selection of the turret ring gives me a width of 515. So now 515 pixels = 51.5". The image is scaled to 10 pixels per inch. Save the image with something like "_Scaled" appended to the image's name. If separate images are to the same scale, you can use the same scaling factor on them all. This method can also work on photographs but perspective warp really affects things. I only do this if no better reference is available. Best results will be from smaller objects in the center of the image, with the scaling reference object and object you want to measure about the same distance from the camera. |

.:|:. © copyright 2008 Jeff Davidson, pt103.com .:|:.
|