
|
|
|

|
|
||||
|
|
||||||
|
|
|
|
Detailing The Italeri 1/35 Scale Elco PT 109 Kit by Stuart Hurley, Finishing Tips
Build Page 1 | Build Page 2 | Finished Model | Finishing Tips |

|
|
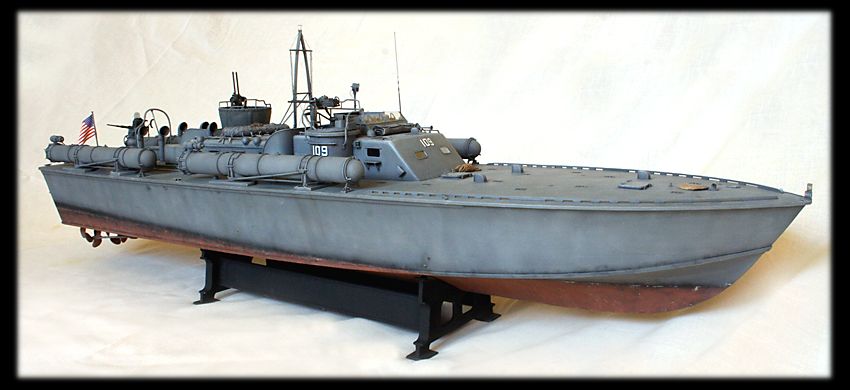
A Few Words On Weathering And FinishingAs a conclusion to this article it has been suggested that I provide a few hints about how I carried out the weathering and finishing of the model. From the outset I intended the model to represent a boat as shipped overseas and as seen in the famous photos taken on board the USS Joseph Stanton in the summer of 1942. The boats were at this time fairly new and largely to original specification. The photos of the boats are of course in black and white so the first question was ‘what colour were they likely to be?’ Popular opinion is that PT 107, 108, 109, and 110 were overall ocean grey 5-0 and this argument is supported by the shade being tonally similar to the Liberty ship. PT 103 and 105 also appear in the photos but have been roughly over sprayed in a lighter shade with the areas carrying the white pennant numbers masked out and the dark background clearly visible. My decision was to go with the overall ocean grey. Incidentally, the photo of 107 from bow on would indicate that she had the front charthouse windows painted over at this time. There is no evidence to suggest that the windows of all the boats were this way, the windows of 103 and 105 are clear. I hadn’t decided which boat I was going to represent at this stage but eventually went with the 109 just as an historical talking point. I left the windows unpainted on my model. In the photos, the boats are showing signs of weathering around the waterline and lower hull and with some light streaking on the sides but not much else, so subtlety is called for. I had decided to paint the model using techniques learned from the armour modelling fraternity that I have used before and which I felt I could successfully carry out without risk, with a few twists of my own thrown in. These are double action airbrush techniques and probably will not translate over to brush painting. There are some amazing brush painters out there and they have an art form all of their own to get similar results, which I would not dare to attempt. Some hate it (because it is often overstated) but I really like the ‘forced shadow’ appearance and also try to emulate an effect known as ‘colour modulation’ in my models. I am not the greatest exponent of these techniques by a long shot, and a quick web search will find some breath-taking examples of this art, but I will attempt to describe my methods here in the hope that some modellers who have not tried it will be inspired to give it a go and maybe add their own interpretations. Best to try it for the first time on a scrap kit though. You will need to carefully plan your build to allow for painting, this can mean painting sub-assemblies, masking or leaving clear parts off until the final stages. Whatever suits you. I was concerned that I would push out a window and be unable to re-attach it so left the cabins off and fitted the windows last. Subsequently, I had big problems with the fit of the charthouse and risked ruining the model right at the end. Sometimes the best laid plans don’t work out. Assuming that all surfaces are ready for paint, the first stage in the process is an overall (including the lower hull) shade much lighter that the final main colour, in this case a light grey in a paint of your choice. I use Humbrol enamels. Make sure it’s nice and smooth as there is no going back.
Colour modulation and light effects.This assumes that the light is falling on the subject from above and requires the model to be painted from the top surfaces down, light to dark. I painted the top surfaces of the cabins, top of the tubes, top edges of screens, top of the mast and the hatches an even lighter shade. Where there are angled surfaces, such as the charthouse, try to accentuate the top edges of the panels and changes of angle by masking.
Pre-shading.With black or dark grey, airbrush in all the recesses and areas that would be in shadow, around lower edges of panels and hatches in and around raised detail. This is easier to do than describe but a look at the photos will give an idea.
Counter shading.With white, lightly fill in the centres of panels and hatches, and tops of raised detail. Any slips with the black can be tidied up here. The effect will be very stark at the moment and you are thinking ‘This looks awful’ but hang in there. To break up the large areas of monotone, I then carried out an operation which can only be described as a mottle, with black and white. I went over the deck and down the sides and around the lower hull with this. This effect will only come to life at the later stages so don’t worry. Over all this goes the main colour. Try to get your colour right (on your scrap kit) first time as any repainting will ruin the previous efforts. It is best to go with a slightly lighter shade rather than an exact match of your authentic colour, as the model inevitably becomes darker as you carry out your shading and weathering. Once again, do some tests on a scrap kit. The top coat of paint should be just thin enough to allow the tonal effects to show through. Remember, you can add more colour but not remove it, so build up slowly. If you decide that there is too much tonal effect here or there you can lightly fill in with your top colour to tone it down a little. One thing I have noticed is that this effect is accentuated by flash photography and can look false if overdone. This is why it’s had some bad press. I think it is because by nature of creating the shadows with paint, it can look unnatural if it is too stark. It does enhance a model in my opinion but has to be subtle to work.
Pin washes and dry brushing.I mixed my wash in a small jar as I would need a lot of it. I used black on this model. Others will prefer brown or grey. Washes will hold no mysteries for most modellers and the main problem with this kit is its sheer size. Just take your time loading a pointed brush with your mix and touching it around raised detail and in crevices. As you go, neatly blend in your washes with your thinner and try not to let it pool. When all is dry it is time to blend all the colours and accentuate all the raised detail and edges. Dry brushing has gone out of fashion in some circles, but I like the effect. For me it goes back to the days of ‘The Verlinden Way’ books where I marvelled at how Francoise Verlinden achieved his fantastic effects of shading and highlights. Start with your top colour to blend the washes, then work with gradually lighter colours to accentuate the edges and raised areas.
Lower hull.I settled on a brick red for the antifoul coating. In the photos all the boats have a lot of salt marks on the lower hull and along the waterline is a very dark stain, probably oil deposits and algae. In order to further understand how these deposits look I studied some general colour photos of boats out of water. The red was airbrushed first and weathered using light grey enamel paints and some MIG concrete pigment suspended in enamel thinners. This was applied using ragged sponge to get a random speckled effect. I applied the load line decals now as they would need to be include in the weathering process. The water stains were applied in steps, using grey enamels over masks and finishing by brush. I carried out some blending and mottling using a lighter version of the brick red. The dark waterline staining was done freehand in black using a straight edge of card as a guide. This is quite narrow at the bow then flares out towards the stern where the boat would squat in the water at speed. This is one area where your planning will come in handy as it is impossible to paint this feature with the mufflers in place. Some yellow/green and brown mottling was done in small areas to give an algae effect.
Streaking.The water streaking down the sides of the boat from vents and from overhanging deck features were applied using burnt umber oils. This is done by applying a spot of paint at the top of where you want your streak, and with a wide brush dampened with thinner, dragging it downwards. If you are not happy with it you can clean off and try again. It is best to apply a guide of masking tape in order to get all your streaks in the same vertical plane.
Detail painting.When you are satisfied that your main painting is done you can move on to the painting of the detail parts and applying all those little bits that you either broke off, or were leaving until later. I mentioned earlier Verlindens’ method of painting, and one tip I learned from his books is what he calls ‘metalizing’. Using propelling pencil graphite inserts, I prepare a powder by grinding them up and then apply the powder to metallic parts with a soft brush. This has to be quite subtle to work. The Oerlikon 20mm was semi –gloss black but the coating on the .50 cals in particular has a dark grey appearance. The graphite process works very well on these.
Chipping.Around the hatches and on the gun depression rails I added some chipping similar to that usually applied to armour models. A bit of artistic license here, and I went quite easy on it as the boats were generally well maintained and paintwork was regularly touched up. This is applied firstly with a lightened version of the base colour, in this case grey, and then the chip is touched in with dark brown or black. Some scratch marks were applied to areas of high wear, such as the edges of the cabins above the footsteps, around hatches and the inside of the bridge wings.
Rudders, screws and shafts.These were added last. The screws were manganese bronze so were painted in a mix of brass and red brown and rubbed with the graphite powder. The shaft struts were also cast in this metal and I have read that they were unpainted, so I treated these to a coat of the same colour. The shafts themselves were monel (stainless steel) so were painted with streaky mix of silver and black. The rudders were painted hull colour and weathered to match. I couldn’t find any evidence that zinc rudder anodes were fitted to the boats at this time so elected not to represent these. That is about it. I hope that these notes will give some the inspiration to have a go at weathering if they have not tried it before.
Images
|

.:|:. © copyright 2008 Jeff Davidson, pt103.com .:|:.
|